ideanote
inCAD Library

Make sure to read this before use

What is inCAD Library?

  • Helpful application examples for mechanical engineers.

The Concept of inCAD Library

  • Online application library with a range of ideas for all manufacturing industries.
  • Save design time and learn new design applications when you are concepting new machines.

Disclaimer

  • MISUMI may not offer all parts in each application design. Available parts can only be purchased separately not as a unit shown in each application design.
  • MISUMI does not guarantee quality, accuracy, functionality, safety or reliability for the combination of the parts in each application example. Accept these points prior to use.
  • 2014 Copyright MISUMI
  • The data cannot be used for any purposes (including sales promotion) except for designing your machine.
  • All associated CAD is free. MISUMI reserves the right at its sole discretion to cancel, terminate or modify this offer.
  • MISUMI may change, add or delete application examples posted without prior notice.
  • MISUMI assumes no responsibilities for any damage incurred resulting from your use of the Service or any change, addition or deletion by MISUMI of the application examples for any reason whatsoever.

Features of inCAD Library

  1. Get great new design ideas for these application examples.
  2. Over 200 design application ideas collected from dozens of industries!

  3. Find application examples quickly! Search by function, workpiece shape, etc.

  4. Download the CAD models for each application example.
  5. Log in to download free CAD models.
    Download CAD for the entire application example!

Good IDEA! Button

Click the Good IDEA! Button when you like an application example!

*Can only be clicked once per application example.

  • Upper right corner on the page of application example details

  • Pop-up dialog for CAD data downloading

Back to top

inCAD Library Keyword Search
inCAD Library No. Search

No.000202 Depth Gauge

Dedicated depth gauge tailored to specific workpiece shapes.

Related Category

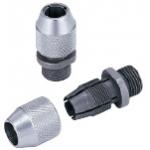
Dial Gage Holders

Product name Clamp Sleeve for Gauge Device
Part number DGHL1
* Orange colored cells in the table below indicate the part numbers used in this example.

Selection criteria

Used for mounting dial gauge

Back to page top

Available sizes

■Dial Gage Holders

Material Surface Treatment
Knob Collet
JIS-SUP6(Spring Steel) Chrome Plating Sandblasted Finish

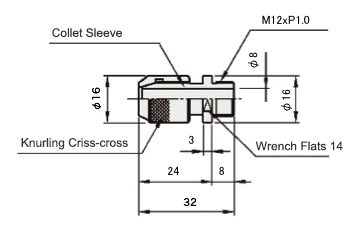
■Dimensions of Dial Holder

Back to page top

Hex Socket Screws

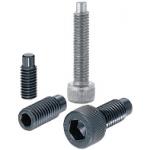
Product name Hex Socket Screws/Dog Point/Head Cap Screw
Part number CBBG5-12
* Orange colored cells in the table below indicate the part numbers used in this example.

Selection criteria

Low cost and easily available as screws for upper/lower limit setting

Back to page top

Available sizes

■Hex Socket Screws - Dog Point

Material Hardness Surface Treatment
EN 1.7220 Equiv. 45HRC- Black Oxide
38-43HRC
EN 1.4301 Equiv. - -

■Sizes and Dimensions

(mm)

Thread Dia. Thread Length Nose Dia. Nose Length
12 16 20 25 30 35 40 45 50
4 3 3
5 4 4
6
8 6 5
10 8 6

Back to page top

Accuracy Info

■Hex Socket Screws - Dog Point accuracy

(mm)

Thread Dia. Nose Dia. Nose Dia. Tolerance Nose Length Tolerance Thread Length Tolerance
4 3 -0.1
-0.2
+0.2
0
-0.3
-0.6
5 4
6
8 6 -0.1
-0.3
10 8

Back to page top

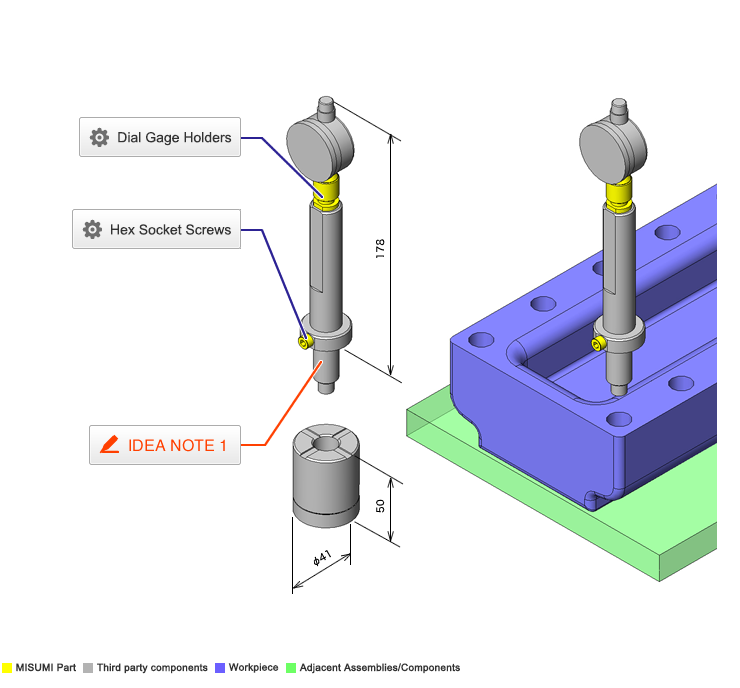
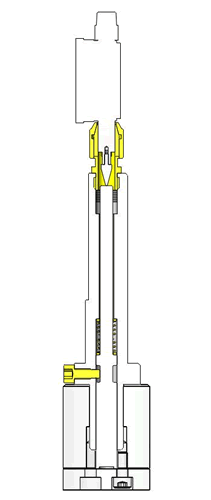
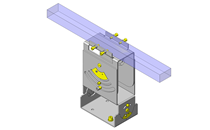
IDEA NOTE Dedicated depth gauge tailored according to workpiece shape

The zero point of the gauge is adjusted by using a high-accuracy master having the same shape as the workpiece hole. By using this gauge, the depth of the workpiece hole is measured at a high accuracy.

  • TERMS AND CONDITIONS FOR USE OF CAD DATA
    Your access to the CAD data that MISUMI Corporation (hereinafter referred to as the Company) posts on this site (including 3D CAD data, intermediate 3D CAD data and 2D CAD data; hereinafter referred to as the Data) are of products manufactured and/or sold by the Company (hereinafter referred to as the Products) assumes that you have read and accepted these terms and conditions which govern your use of the Data. If you do not agree to these terms and conditions, you must stop using this website and the Data. You must not use the Data for any unlawful purpose or in any manner inconsistent with these terms and conditions.
    1. CAD Data
    The Data is prepared for assisting the Company's users in the CAD design process by providing dimensions and other Product information. In order to provide the best speed and stability working within this site, the Product drawings were simplified to reduce the size of the Data. For instance, some of the Products are shown without the oil groove shape, screws or spring shape. Also, please be aware that the tolerance, surface roughness and/or chamfer of the Data may vary from the actual Products.
    2. Disclaimer on Data
    While the Company has carefully prepared the Data, accuracy of the Data is not guaranteed and is subject to the variances as described above. The Company may also modify, add or delete the Data at any time without prior notice. The Company assumes no liability for any direct, indirect, consequential or special damages that you may claim resulted from your use of the Data or any changes to or deletions of the Data regardless of the reason. The Company provides no warranty as to the quality, accuracy, functionality, safety or reliability of the combination of Products and parts. Example applications and combinations of the Products are provided for illustrative purposes only.
    3. Copyright
    Copyrights to the content and the Data belong to the Company or the manufacturers of the Products. The said copyright is protected by the Copyright Act and international treaties. The use (including duplication, modification, uploading, posting, transmission, distribution, licensing, sales and publishing) of the Data except for the purpose to use the Data described above without prior approval of the Company is not allowed. The Data cannot be used for any purposes (including sales promotion) except for designing your machine. If you violate this provision or the laws or regulations, the Company may prohibit you from the use of the Data, the Company’s site and/or take legal action. So long as you comply with these terms and conditions, the Company grants to you a non-exclusive, non-transferable, revocable license to access and use the Data for the sole purpose of assisting you in designing machines that incorporate products.
    4. Disclaimer of Warranty
    ANY AND ALL CONTENT APPEARING ON THIS WEB SITE IS PROVIDED FOR INFORMATIONAL PURPOSES ONLY. THIS WEB SITE, ITS CONTENT AND ITS LINKS ARE PROVIDED ON AN "AS IS" AND "AS AVAILABLE" BASIS AND ARE USED ONLY AT YOUR SOLE RISK, TO THE FULLEST EXTENT PERMISSIBLE BY LAW. THE COMPANY DISCLAIMS ALL WARRANTIES, EXPRESS OR IMPLIED, OF ANY KIND, REGARDING THIS WEB SITE (INCLUDING ITS CONTENT, HARDWARE, SOFTWARE AND LINKS), INCLUDING AS TO FITNESS FOR A PARTICULAR PURPOSE, MERCHANTABILITY, TITLE, NON INFRINGEMENT, RESULTS, ACCURACY, COMPLETENESS, ACCESSIBILITY, COMPATIBILITY, SECURITY AND FREEDOM FROM COMPUTER VIRUS. THE COMPANY WILL NOT BE LIABLE FOR ANY DAMAGES OR LOSSES, INCLUDING DIRECT, INDIRECT, CONSEQUENTIAL, SPECIAL, INCIDENTAL OR PUNITIVE DAMAGES AND/OR LOST PROFITS, IN CONNECTION WITH USE OF THE INTERNET, THIS WEB SITE, ITS CONTENT OR ITS LINKS
    Further, the Company will not be liable to you for any failure or delay by the Company to provide access to the Data or any of its obligations under these terms and conditions where such failure or delay is the direct or indirect result of any circumstances beyond the Company's reasonable control (and the Company's obligations will be suspended for the duration of such circumstances).
    5. Policy of Third Parties
    You may be required to separately agree to third party's policies if you use third party software to create or browse the Data or use a third party’s CAD data. In this case, the Company does not assume any responsibility for defects of such CAD data or the software of the third party or violation of their rights. Understand them before use.

    CAD Data Download (Unit Assembly)

    CAD Data Download: File Format
    生成

    Thank you for downloading the data.

    Click the Good IDEA! button when this application example is helpful.


    This data is utilized in order to list more useful application examples in the future.

    Cautions on the CAD data

    1. Assembly data shows the assembly drawings in the concept design phase. The sole purpose of the data is to explain the structure and functionality of the assembly and is not considered nor to be used as a final design.
      You will need to edit the Data so that it meets your specific design conditions.
    2. The CAD data unit assembly consists of sub-assemblies.
      Each sub-assembly unit can be used as it is or can be edited.
    3. * The part in the frame is a sub-assembly unit.

    4. The Data for fabricated parts is based on easy-to-edit dimensions and shapes in sketches and histories.
    5. The Data including the third-part components are made by the Company.

    Back to top

  • * Unit assembly CAD data consists of some sub-assemblies.
       Each sub-assembly unit can be used as it is or can be edited.

Application Overview

Purpose

  • Place the gauge in the master and measure the workpiece hole dimensions to adjust the dial and to find the zero point.
  • Using a structure that allows stroking up and down from the center value by means of a spring, the upper and lower run-outs of the tolerance are measured.

Points for use

  • The workpiece is manually set and removed from the testing hole.
  • Because the gauge needs to have a high accuracy the specialized manufacturing is expensive.

Target workpiece

  • Workpiece: aluminum die cast housing
  • Material:EN AC-46100 Equiv.
  • W150mm x D300mm x H70mm
  • Mass:5.8kg

Design Specifications

Operating Conditions or Design Requirements

  • Pin stroke:4mm
  • W40 x D37 x H217mm(when gauge only is used)
  • W40 x D41 x H227mm(when master is included)

Required Performance

  • Accuracy of zero point adjustment: ±0.01mm or less
  • Gauge push force 5N

Selection Criteria for Main Components

  • Round coil spring
    • A compression spring is selected so that the stroke starts when the gauge makes contact with the bottom surface of the hole.

Design Evaluation

Verification of main components

  • A spring suitable for gauge push force is selected.
  • Compression spring load
    • Calculation formula: reaction force F = kx
    • Gauge push load: F = 5N
    • Assumed deflection when inserted into workpiece (minimum): x = 10mm
    • From k = F/x = 5/10 = 0.5,
      spring constant: k = 0.5 N/mm is selected.

Other Design Consideration

  • A measurement structure that allows stroking up and down from the center value by means of a spring, the upper and lower run-outs of the tolerance are recorded.
  • To remove foreign matter adhered to the bottom surface of the depth gauge, shallow grooves in a cross shape are added on the top face of the master.
  • Workability is enhanced by configuring the hole in the upper master in two steps.

Explore Similar Application Examples

Page - / -

Part List

No. Part Name Sample picture MISUMI Part Number
For Price and Days to ship click on Part No.
Quantity
1 Dial Gage Holder DGHL1 1
2 Screw With Nose CBBG5-12 1
3 Metal Washers FWSSB-D9.5-V6.5-T1.0 2
4 Compression Springs WF8-25 1
  • The part list above contains only MISUMI parts.
    The list of parts and machined products of other manufacturers than MISUMI can also be downloaded by part list download (CSV).
  • TERMS AND CONDITIONS FOR USE OF CAD DATA
    Your access to the CAD data that MISUMI Corporation (hereinafter referred to as the Company) posts on this site (including 3D CAD data, intermediate 3D CAD data and 2D CAD data; hereinafter referred to as the Data) are of products manufactured and/or sold by the Company (hereinafter referred to as the Products) assumes that you have read and accepted these terms and conditions which govern your use of the Data. If you do not agree to these terms and conditions, you must stop using this website and the Data. You must not use the Data for any unlawful purpose or in any manner inconsistent with these terms and conditions.
    1. CAD Data
    The Data is prepared for assisting the Company's users in the CAD design process by providing dimensions and other Product information. In order to provide the best speed and stability working within this site, the Product drawings were simplified to reduce the size of the Data. For instance, some of the Products are shown without the oil groove shape, screws or spring shape. Also, please be aware that the tolerance, surface roughness and/or chamfer of the Data may vary from the actual Products.
    2. Disclaimer on Data
    While the Company has carefully prepared the Data, accuracy of the Data is not guaranteed and is subject to the variances as described above. The Company may also modify, add or delete the Data at any time without prior notice. The Company assumes no liability for any direct, indirect, consequential or special damages that you may claim resulted from your use of the Data or any changes to or deletions of the Data regardless of the reason. The Company provides no warranty as to the quality, accuracy, functionality, safety or reliability of the combination of Products and parts. Example applications and combinations of the Products are provided for illustrative purposes only.
    3. Copyright
    Copyrights to the content and the Data belong to the Company or the manufacturers of the Products. The said copyright is protected by the Copyright Act and international treaties. The use (including duplication, modification, uploading, posting, transmission, distribution, licensing, sales and publishing) of the Data except for the purpose to use the Data described above without prior approval of the Company is not allowed. The Data cannot be used for any purposes (including sales promotion) except for designing your machine. If you violate this provision or the laws or regulations, the Company may prohibit you from the use of the Data, the Company’s site and/or take legal action. So long as you comply with these terms and conditions, the Company grants to you a non-exclusive, non-transferable, revocable license to access and use the Data for the sole purpose of assisting you in designing machines that incorporate products.
    4. Disclaimer of Warranty
    ANY AND ALL CONTENT APPEARING ON THIS WEB SITE IS PROVIDED FOR INFORMATIONAL PURPOSES ONLY. THIS WEB SITE, ITS CONTENT AND ITS LINKS ARE PROVIDED ON AN "AS IS" AND "AS AVAILABLE" BASIS AND ARE USED ONLY AT YOUR SOLE RISK, TO THE FULLEST EXTENT PERMISSIBLE BY LAW. THE COMPANY DISCLAIMS ALL WARRANTIES, EXPRESS OR IMPLIED, OF ANY KIND, REGARDING THIS WEB SITE (INCLUDING ITS CONTENT, HARDWARE, SOFTWARE AND LINKS), INCLUDING AS TO FITNESS FOR A PARTICULAR PURPOSE, MERCHANTABILITY, TITLE, NON INFRINGEMENT, RESULTS, ACCURACY, COMPLETENESS, ACCESSIBILITY, COMPATIBILITY, SECURITY AND FREEDOM FROM COMPUTER VIRUS. THE COMPANY WILL NOT BE LIABLE FOR ANY DAMAGES OR LOSSES, INCLUDING DIRECT, INDIRECT, CONSEQUENTIAL, SPECIAL, INCIDENTAL OR PUNITIVE DAMAGES AND/OR LOST PROFITS, IN CONNECTION WITH USE OF THE INTERNET, THIS WEB SITE, ITS CONTENT OR ITS LINKS
    Further, the Company will not be liable to you for any failure or delay by the Company to provide access to the Data or any of its obligations under these terms and conditions where such failure or delay is the direct or indirect result of any circumstances beyond the Company's reasonable control (and the Company's obligations will be suspended for the duration of such circumstances).
    5. Policy of Third Parties
    You may be required to separately agree to third party's policies if you use third party software to create or browse the Data or use a third party’s CAD data. In this case, the Company does not assume any responsibility for defects of such CAD data or the software of the third party or violation of their rights. Understand them before use.

    CAD Data Download (Unit Assembly)

    CAD Data Download: File Format
    生成

    Thank you for downloading the data.

    Click the Good IDEA! button when this application example is helpful.


    This data is utilized in order to list more useful application examples in the future.

    Cautions on the CAD data

    1. Assembly data shows the assembly drawings in the concept design phase. The sole purpose of the data is to explain the structure and functionality of the assembly and is not considered nor to be used as a final design.
      You will need to edit the Data so that it meets your specific design conditions.
    2. The CAD data unit assembly consists of sub-assemblies.
      Each sub-assembly unit can be used as it is or can be edited.
    3. * The part in the frame is a sub-assembly unit.

    4. The Data for fabricated parts is based on easy-to-edit dimensions and shapes in sketches and histories.
    5. The Data including the third-part components are made by the Company.

    Back to top

Back to top